
By default, SharePoint Document Libraries enable a person to e-mail a link to a document in a document library. This makes sense, because from a security perspective, you want to make sure that whomever clicks on the link actually has access to view the document. SharePoint will take care of authentication, ensuring that person is allowed to view the document. However, someone on Microsoft’s SharePoint discussion board presented an interesting scenario: their users don’t have direct access to their SharePoint site over their network, so they wouldn’t be able to open a link from an e-mail they sent to themselves, to get to that document, because they wouldn’t have access to the SharePoint server URL. Intead, they wanted to be able to actually e-mail the document itself from the document library to themselves, so they could read it apart from being on the SharePoint site. I have written the code neceesary to install a Feature that will do just that. (Please note, I have not added extensive error handling, validation, multi-lingual resources, web.config values, etc., for the sake of brevity.)
The first step is to create a new project in Visual Studio. (I have used C# for this example.) I have named the project MailDocument. I will create a folder structure that contains a DeploymentFiles folder and a TEMPLATE folder. Inside the TEMPLATE folder I have two more folders: a FEATURES folder and a LAYOUTS folder, (mirroring the structure of the folders in the C:\Program Files\Common Files\Microsoft Shared\web server extensions\12\TEMPLATES folder). Create a folder called MailDocument inside the FEATURES folder. Inside your project, add a reference to Microsoft.SharePoint. (You can browse to this dll, located in the ISAPI folder of the “12” directory.)
First, I want to create an ASPX page that will contain just a few controls: a TextBox for the user to enter the e-mail address they want to send the e-mail to, a Button control they can click to send the e-mail, and a Label control that will display a nice message to the user when it’s finished sending, as well as Panel control that will hide the TextBox and the Button when the e-mail has been sent. Create a page called MailDocument.aspx inside the LAYOUTS folder.
This page is going to be an application page in SharePoint, (i.e. will live in the LAYOUTS directory in the C:\Program Files\Common Files\Microsoft Shared\web server extensions\12 folder), so it will use the application.master Master Page. I will fill two content placeholders on the page: one for the page title, and another for the page content.
<asp:Content ID="Title" runat="server" ContentPlaceHolderID="PlaceHolderPageTitleInTitleArea">
E-mail a Document
</asp:Content>

<asp:Content ID="ContentMain" runat="server" ContentPlaceHolderID="PlaceHolderMain">
  <asp:Panel ID="MailDocumentPanel" runat="server">
    Please enter the e-mail address you would like to send the document to:<br/>
    <asp:TextBox ID="EmailAddress" runat="server" Width="300"/>
    <asp:Button ID="GoButton" runat="server" Text="Go" OnClick="GoButton_Click" />
  </asp:Panel>
  <asp:Label ID="SuccessMessage" runat="server"/>
</asp:Content>
The next step is to create a code-behind page for this page. Create a file called MailDocument.aspx.cs inside the FEATURES folder. Add the following “using” directives and add a namespace and class name as follows:
using System;
using System.IO;
using System.Net.Mail;
using System.Net.Mime;
using System.Web.UI;
using System.Web.UI.WebControls;
using Microsoft.SharePoint;
using Microsoft.SharePoint.Administration;
using Microsoft.SharePoint.WebControls;

namespace MailDocument
{
  public class MailDocument : LayoutsPageBase
  {
  }
}
Now that we have a code-behind page, let’s wire up the ASPX page to it. SharePoint can’t reference code-behind pages the way a normal ASP.NET web application does. In order for SharePoint to reference that code-behind page it will reference the class inside a compiled dll, and in order for the dll to be used by SharePoint, in needs to be trusted. One way to do that is to deploy it to the GAC. In order for a dll to be in the GAC, it needs to get signed. So the next step you’ll want to take is to right click on the project properties, click on the “Signing” tab, and create a new key. After that, we’ll want to extract the public key. (For a quick way to do this in Visual Studio, visit Andrew Connell’s blog entry on the topic.) Now that we’ve done all that, we can wire the two pages together by adding the following line to the top of the ASPX page:
<%@ Page Language="C#" MasterPageFile="~/_layouts/application.master" Inherits="MailDocument.MailDocument, MailDocument, Version=1.0.0.0, Culture=neutral, PublicKeyToken=[Your token goes here]" %>OK, now that we have front-end page built, let’s write the code that will get the document and send the e-mail.
ContentPlaceHolder mainContentPlaceholder = this.Master.FindControl("PlaceHolderMain") as ContentPlaceHolder;
((Panel)mainContentPlaceholder.FindControl("MailDocumentPanel")).Visible = false;
((Label)mainContentPlaceholder.FindControl("SuccessMessage")).Text = "Your message has been sent.";
Now that we have the ASPX page put together, we need to start building the Solution package that contains the feature. The first step is to create a manifest file. Create a new XML file in the root of your project and call it manifest.xml. Add the following XML to it:
<Solution xmlns="http://schemas.microsoft.com/sharepoint/"
  SolutionId="72CFD5DA-10F0-499b-B4E9-863B6DB87717"
  ResetWebServer="TRUE">
  <FeatureManifests>
    <FeatureManifest Location="MailDocument\feature.xml"/>
  </FeatureManifests>
  <TemplateFiles>
    <TemplateFile Location="LAYOUTS\MailDocument.aspx"/>
  </TemplateFiles>
  <Assemblies>
    <Assembly DeploymentTarget="GlobalAssemblyCache" Location="MailDocument.dll" />
  </Assemblies>
</Solution>
This code is saying three things about the solution: 1. The feature manifest can be found inside the MailDocument folder in the FEATURES folder. 2. The MailDocument.aspx page is in the LAYOUTS folder. 3. Deploy the dll to the GAC.
The next step is to create the feature manifest. To do this, create an XML file called feature.xml inside your TEMPLATE/FEATURES/MailDocument folder in your project. Add the following XML to the file:
<Feature xmlns="http://schemas.microsoft.com/sharepoint/"
  Id="5785441E-DD86-4df5-A867-D7AC37712A27"
  Title="Mail Document"
  Scope="Web" Hidden="false" Version="1.0.0.0"
  Description="Allows you to e-mail documents from your Document Libraries">
  <ElementManifests>
    <ElementManifest Location="elements.xml"/>
  </ElementManifests>
</Feature>
Notice that the Feature’s Scope is “Web”. That means this feature can be deployed for a particular subsite, meaning all the document libraries in a particular site will have this new functionality when the feature is deployed. The ElementManifest node is telling the feature where to find the element manifest file. So, last but not least, let’s add the elements.xml file. To do this, create a file called elements.xml in the same directory you added the feature.xml file.
Although the elements manifest can be used to deploy files to a particular SharePoint library, we’ve already used the Manifest to instruct the solution package to deploy the ASPX page to the file system, and the dll to the GAC, so we don’t need to deploy any more files. However, we do want our users to be able to get to the page they created. We do this by adding a “custom action”, which in this case, will add an item to the context menu when a user right clicks on a list item in the document library. Add the following XML to the elements.xml file:
<Elements xmlns="http://schemas.microsoft.com/sharepoint/">
<CustomAction
Id="MailDocument.Link"
RegistrationType="List"
RegistrationId="101"
Location="EditControlBlock"
Sequence="350"
Title="E-mail Document"
ImageUrl="~site/_layouts/IMAGES/EML16.GIF"
Description="Allows a user to e-mail a document in a document library to themselves." >
<UrlAction Url="/_layouts/MailDocument.aspx?ItemId={ItemId}&ListId={ListId}"/>
</CustomAction>
</Elements>Let’s look at the XML. The RegistrationType attribute is telling us to add this action to a particular kind of list. The RegistrationId attribute is the Id for a Document library. Those two properties tell the action to be available on all lists that are Document Libraries. The Location attribute of “EditControlBlock” indicates the context menu that appears when the user right clicks an item in the library. The Title is what will appear in the context menu, and the ImageUrl indicates the location of the icon that will appear next to the item in the context menu (if you so choose to add one. In our case, we’re using an image from the default SharePoint installation.) The UrlAction node indicates the URL the user should be taken to when the click the item in the context menu. Notice that the item id and list id can be passed using {ItemId} and {ListId} in the query string.
You’ve done it! You’ve created all the files necessary for your feature. The last thing we need to do is to compile the solution. In order to this, we’ll need to take a few steps.
manifest.xml
bin\debug\MailDocument.dll MailDocument.dll
TEMPLATE\FEATURES\MailDocument\feature.xml MailDocument\feature.xml
TEMPLATE\FEATURES\MailDocument\elements.xml MailDocument\elements.xml
TEMPLATE\LAYOUTS\MailDocument.aspx LAYOUTS\MailDocument.aspx
The very last thing we need to do is to tell Visual Studio to create the CAB and WSP files (the WSP being what will ultimately be deployed to SharePoint) after the project compiles. To do this, you’ll need to right click on the project and say “Unload project”. (If you don’t see this option, you’ll need to change your Visual Studio settings so that you can see the VS Solution file.) After you have unloaded the project, right click the project and say “Edit MailDocument.csproj”. This will pull up the XML file. Go to the very bottom of the file and look for the node that says “Import Project”. Right after that node, and a second node that looks like this:
<Import Project="DeploymentFiles\BuildSharePointPackage.targets" /><Target Name="AfterBuild">
  <CallTarget Targets="BuildSharePointPackage" />
</Target>
The page itself is going to live in the LAYOUTS directory, which all lists will reference. That being the case, we need to know which list, and which list item, we’re going to be using. To do this, we’ll pass the List GUID and the Item ID as parameters in the query string to the page. Once we’ve figured out which list item we’re dealing with, we can grab the document file itself. The code looks as follows:
protected void GoButton_Click(object sender, EventArgs e)
{
  SPList list = SPContext.Current.Web.Lists[new Guid(Request.QueryString["ListId"])];
  SPDocumentLibrary docLib = (SPDocumentLibrary)list;
  int id = System.Convert.ToInt32(Request.QueryString["ItemId"]);
  SPListItem listItem = docLib.Items.GetItemById(id);
  if (listItem.File != null)
  {
    ContentPlaceHolder mainContentPlaceholder = this.Master.FindControl("PlaceHolderMain") as ContentPlaceHolder;
    string toEmailAddress = ((TextBox)mainContentPlaceholder.FindControl("EmailAddress")).Text.Trim();
    SendEmail(toEmailAddress, listItem.Title, listItem.File, list);
  }
}
The next thing we need to do is actually send the e-mail. We’ll want to use the e-mail server that was configured in the SharePoint Central Administration. We’ll find the name of the SMTP server, create an e-mail message, attach the file to the e-mail, and send it. Here’s the method:
private void SendEmail(string toAddress, string subject, SPFile file, SPList list)
{
  SPWebApplication webApp = SPContext.Current.Site.WebApplication;
  SPOutboundMailServiceInstance mailServer = webApp.OutboundMailServiceInstance;
  string smtpServer = mailServer.Server.Address;
  string listUrl = SPContext.Current.Web.Url + list.DefaultViewUrl;
  MailMessage message = new MailMessage("administrator@linwareinc.com", toAddress);
  message.Subject = subject;
  message.IsBodyHtml = true;
  message.Body = "This file was sent from the following SharePoint list: " +
    "<a href="" + listUrl + "">" + listUrl + "</a>.";
  Stream stream = file.OpenBinaryStream();
  //You can add code to figure out which MIME type to use based on the type of attachment.
  Attachment attachment = new Attachment(stream, @"application/msword");
  attachment.Name = file.Name;
  message.Attachments.Add(attachment);
  try
  {
    SmtpClient client = new SmtpClient(smtpServer);
    client.Send(message);
  }
  catch (Exception e)
  {
    throw e;
  }
  finally
  {
    stream.Close();
  }
}- Download the MAKECAB.EXE tool from Microsoft and install it in your WINDOWS\system32 directory. You can download the SDK at http://support.microsoft.com/default.aspx/kb/310618.
- Create a file inside the DeploymentFiles folder of your project and call it BuildSharePointPackage.Targets. Copy the following XML into that file:
<Project DefaultTargets="BuildSharePointPackage" xmlns="http://schemas.microsoft.com/developer/msbuild/2003">
<PropertyGroup>
<MakeCabPath>"C:\Windows\System32\MAKECAB.EXE"</MakeCabPath>
</PropertyGroup>
<Target Name="BuildSharePointPackage">
<Exec Command="$(MakeCabPath) /F DeploymentFiles\BuildSharePointPackage.ddf /D CabinetNameTemplate=$(MSBuildProjectName).wsp /D DiskDirectory1=wsp\$(Configuration) "/>
<Exec Condition=" '$(Configuration)|$(Platform)' == 'Debug|AnyCPU'"
Command="$(MakeCabPath) /F DeploymentFiles\BuildSharePointPackage.ddf /D CabinetNameTemplate=$(MSBuildProjectName).cab /D DiskDirectory1=wsp\$(Configuration)"/>
</Target>
</Project>
Now we need to create a DDF file, which tells MAKECAB.EXE how to package the files we created. Create a new file called BuildSharePointPackage.ddf inside the DeploymentFiles folder. Add the following code to it:
.OPTION Explicit .Set DiskDirectoryTemplate=CDROM .Set CompressionType=MSZIP .Set UniqueFiles=Off .Set Cabinet=On manifest.xml bin\debug\MailDocument.dll MailDocument.dll TEMPLATE\FEATURES\MailDocument\feature.xml MailDocument\feature.xml TEMPLATE\FEATURES\MailDocument\elements.xml MailDocument\elements.xml TEMPLATE\LAYOUTS\MailDocument.aspx LAYOUTS\MailDocument.aspx - The very last thing we need to do is to tell Visual Studio to create the CAB and WSP files (the WSP being what will ultimately be deployed to SharePoint) after the project compiles. To do this, you’ll need to right click on the project and say “Unload project”. (If you don’t see this option, you’ll need to change your Visual Studio settings so that you can see the VS Solution file.) After you have unloaded the project, right click the project and say “Edit MailDocument.csproj”. This will pull up the XML file. Go to the very bottom of the file and look for the node that says “Import Project”. Right after that node, and a second node that looks like this:
<Import Project="DeploymentFiles\BuildSharePointPackage.targets" />At the very bottom of the page you’ll see some node commented out. Replace the “AfterBuild” target with the following code (and uncomment it out):
<Target Name="AfterBuild">
<CallTarget Targets="BuildSharePointPackage" />
</Target>
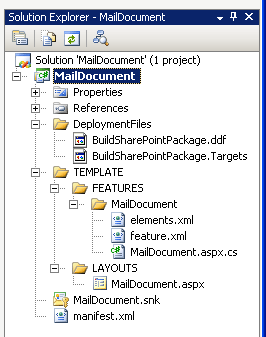
When you’re done, your solution should look like this:

Now reload your project in Visual Studio and compile it. And voila! You should not only get your dll in the Debug directory, but you’ll get a folder called wsp in your project root. (It’s a hidden folder, so you’ll have to toggle the Show All Files icon in your Solution Explorer pane.)
After you have deployed the solution and activated the feature, let’s take a look at the feature in action. Below we have a document library with a Word document in it. Below, you can see the context menu:

When the user clicks on the link, they go to the .aspx page. Notice the URL in the browser, and how it has the list’s guid and the item’s id:

And here’s the e-mail the person gets, including the attachment:

Parts of this code are based on code from a class I took last week by Andrew Connell, SharePoint MVP. You can view his blog at http://www.andrewconnell.com/blog/. I highly recommend Andrew’s course.
If you’d like to read more about how to do the kinds of things I’ve mentioned in this article, visit the following How To’s on Microsoft MSDN site:
How to: Add Actions to the User Interface
Creating a Feature for an Entry Control Block Item in Windows SharePoint Services 3.0
Creating a Solution Package in Windows SharePoint Services 3.0
You can download the code at MailDocument