
For those of you who attended the most recent St. Louis MOSS Camp, you know I presented a topic on SharePoint and OpenXML. I thought it would be helpful to write out step-by-step for you how I created a LOB application with Word 2007. The end result will be a Word 2007 document with a custom Ribbon and a custom Actions Pane that retrieves information from a SharePoint list, which can then be inserted into the document.
The scenario I’ll be basing this example on is one where professors at a university submit their upcoming course information using and InfoPath form to a SharePoint library. Once the forms have been approved, the Registrar wants to easily create a Word 2007 course catalog by dynamically pulling the information from directly from SharePoint.
VSTO
The Visual Studio Tools for Office used to be an add-in to Visual Studio 2003, but it’s now included as a component of Visual Studio 2008. You can view the MSDN Developer center for VSTO here: http://msdn.microsoft.com/en-us/vsto/default.aspx.
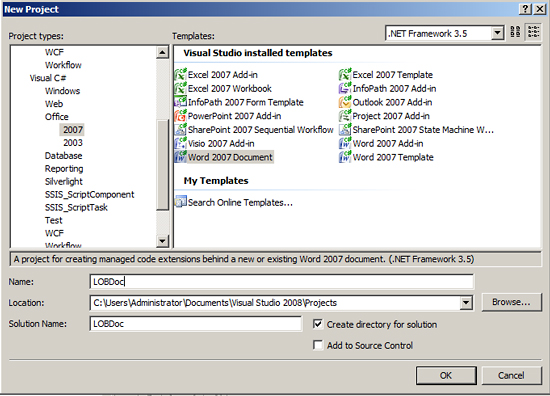
The first thing you’ll do is create a new Word 2007 Document project in Visual Studio. You should see the Word 2007 Project Template under “Office” and “2007”. This example will be created using C#. We’ll name our project LOBDoc.
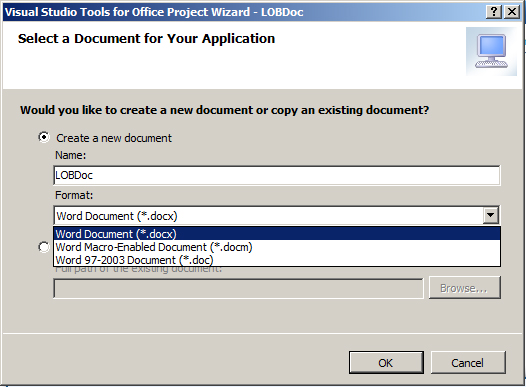
In the next screen, you’ll specify what type of document you’ll be creating, whether it’s a .docx, .docm, or .doc document. In this example, we’ll be creating a .docx document, so we can take advantage of the OpenXML features of Word 2007.
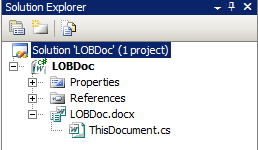
You should now see a base project that looks like this:
Adding the Ribbon and Actions Pane Controls
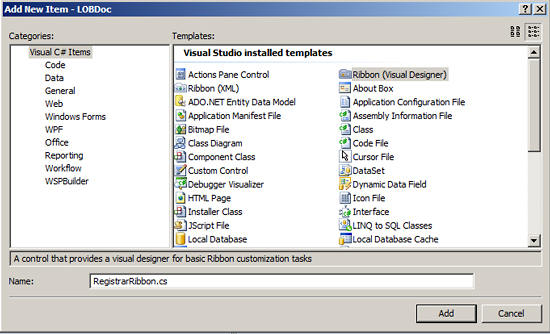
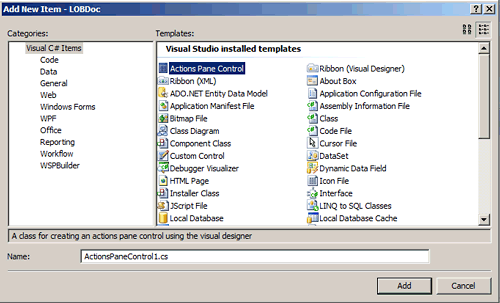
The first thing we need to do is add a custom Ribbon. You can do this by adding the “Ribbon (Visual Designer)” item to your project.
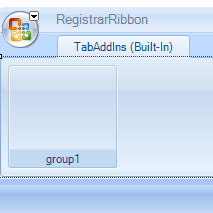
You should now see a new item in your project that gives you a visual interface for designing the Word Ribbon. It already comes with a single group to drop controls into, by default.
The first thing you’ll do is drag and drop the “Button” control from the Toolbox onto the ribbon. The control is in the “Office Ribbon Control” group of controls.

We’ll change the button label to say “Add Course(s)”. The idea is going to be that when a user clicks on the “Add Course(s)” button, it will open up the “Document Actions” task pane in Word, which will allow them to browse the courses in the SharePoint list.
The Document Actions panel is a built-in control in Word. It’s that area that pops open (usually on the right side, next to the Word document) when you perform certain actions. The Actions Pane is the control which allows you to customize what shows up in the Document Actions task pane. We’ll be creating a new Actions Pane control and adding it to the Actions Pane.
Loading the Actions Pane Control
Now it’s time to get down to some coding. The first thing we need to do is to add the Actions Pane control we added to the project to our Ribbon control.
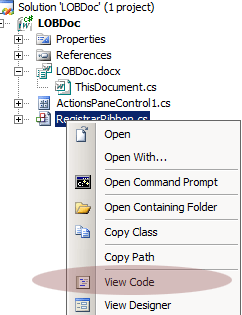
Right click on the Ribbon control and select “View Code” to view the code-behind.
Above the constructor, create a new instance of your Actions Pane control by adding this code:
ActionsPaneControl1 actionsPane1 = new ActionsPaneControl1();The next thing we need to do is to add the Actions Pane control to parent Actions Pane control when the ribbon loads. You can do this by adding the following line of code to the RegistrarRibbon_Load method in the code-behind:
Globals.ThisDocument.ActionsPane.Controls.Add(actionsPane1);If we just left this code as it was, whenever the Word document loaded and therefore the Ribbon loaded, the Document Actions pane would pop open and our Actions Pane control would show up. We don’t really want the pane to open up until someone clicks on the “Add Course(s)” link in our ribbon, so we need to hide our control and close the Document Actions pane right off the bat. So, right after the code you just added to the Load method, add the following two line:
actionsPane1.Hide();
Globals.ThisDocument.Application.TaskPanes[Microsoft.Office.Interop.Word.WdTaskPanes.wdTaskPaneDocumentActions].Visible = false;
Opening and Closing the Document Actions Task Pane on Ribbon Button Click
The next thing we want to do is to add the Click event handler when a user clicks on the “Add New Course(s)” button. The easiest way to add the event handler method is to browse back to the Ribbon, and double click on your button control.
The logic we’re going to add is pretty straight-forward; if the pane is open, close it and hide the Actions Pane control. If the pane is closed, open it and show the Actions Pane control. Add the following code to your OpenActionsMenuButton_Click method:
if (actionsPane1.Visible)
{
actionsPane1.Visible = false;
Globals.ThisDocument.Application.TaskPanes[Microsoft.Office.Interop.Word.WdTaskPanes.wdTaskPaneDocumentActions].Visible = false;
}
else
{
actionsPane1.Visible = true;
Globals.ThisDocument.Application.TaskPanes[Microsoft.Office.Interop.Word.WdTaskPanes.wdTaskPaneDocumentActions].Visible = true;
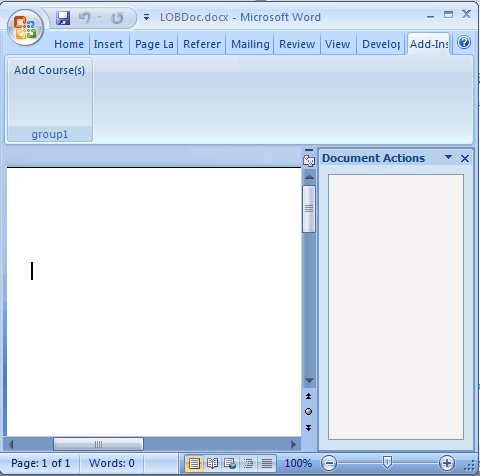
}Try debugging your solution now. You should see a new tab in your Word document, called Add-Ins.
![]()
Click on the Add-Ins tab on you’ll see your new Ribbon. Click on the button, and the Document Actions task pane should show up. It’s empty as of yet, but it’s open! Try clicking on the ribbon link again to close it.
There you go! In Part 2 of the series, I’ll explain how you can populate your Actions Pane control with information from a SharePoint list, and insert that information into your document.