
As I mentioned in my post about Kaizala, Microsoft is constructing a user story around what it has labeled “firstline workers”1. These are workers who are not necessarily sitting at a desk in front of a computer in an office building all day long, but are much more mobile.2 It’s clear that Microsoft is planning for Teams to become the primary mode of communication for Firstline workers.3 Along those limes, the Office 365 “Shifts” app (previously only available to folks with an Office 365 Business license via the StaffHub app) has now been rolled into Teams. This is an app that allows managers to create schedules for employees. Employees (presumably using the mobile Teams app, although the desktop Teams app would work as well), are notified when their shifts are happening, and can even request to exchange a shift with another employee. The shift schedules are also printable, which although seeming antiquated in an office building, is often the easiest and most cost-effective way for small businesses to notify employees of a schedule.
Getting Started
The first thing to note is that a schedule needs to be tied to a Team. In order to create a schedule, you must be a Team owner.
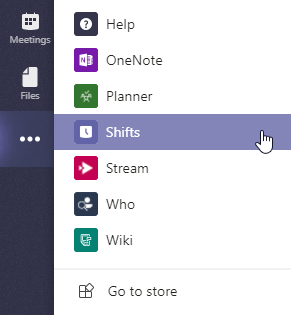
Figure 1: Getting to the Shifts App in the Teams desktop application
The Shifts app itself can be a little hidden in the Teams user interface. To get to it from the desktop Teams application, you’ll find the navigation bar on the left side, and click the small ellipsis below the buttons to get to chat, teams, meetings, files, etc. This will pop open a menu from which you can select “Shifts”. (See Figure 1.)
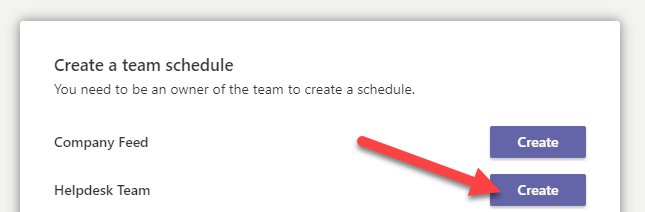
Figure 2: Create Shift Schedule Dialog
If you never created a schedule before, you will be presented with a dialog immediately to create a new schedule. You will see a list of the teams for which you are an owner, and you can click the Create button next to the team to create a schedule for it. (See Figure 2.) You’ll be asked for a time zone for your app. (This is very important, because you don’t want people showing up for a shift an hour or two late, because the person creating the schedule is in a different time zone than the person working the shift!)
Shift Views

Figure 3: Shift View Options
A schedule can present several different views of the same information: you can view the schedule itself and see who is working each shift in the schedule, and which shifts are vacant and need someone to work it. You can also view schedules according to person; you can look at a particular person and see when they are scheduled to work. You can also choose whether you want to see open shifts listed or not. (When you’re building the schedule you probably want to see the shifts listed so you know where to “plug the holes” but once the schedule is set, the view is little more compact when the open shifts aren’t displayed.) See Figure 3 for a list of views.
Last but not least, you can display your shifts in “groups”. (Don’t be confused by this; this has nothing to do with Office 365 group behind the team.) A group is simply a way of creating a separate set of shifts, but everyone in your Team still can view everything. For example, I have a client who runs an early childhood center. There are different rooms for infants, toddlers, etc. My client is able to create a different set of shifts across rooms. But since they’re all in the same “schedule”, she can ensure she isn’t double-booking an employee for two shifts at the same time in different rooms, because she would see that in the “People” view. Additionally, she can schedule “floaters” to float between the rooms during shifts. But by having her shifts separated by room, she can tape the room schedule to the door of each room each week.
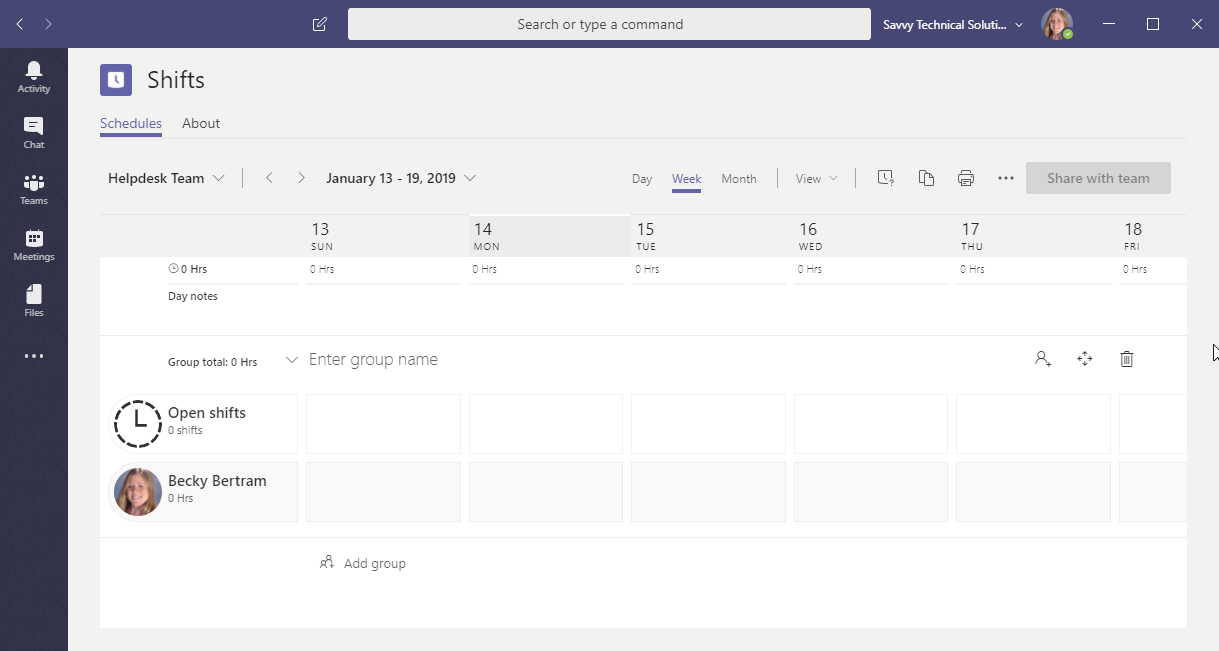
Figure 4: Blank Shift Schedule in the “Person” view.
Creating Shifts
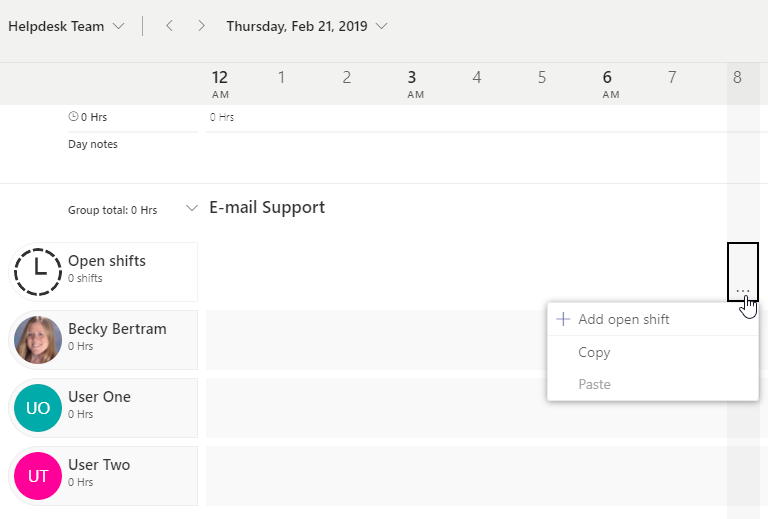
Figure 5: Add Open Shift
The first thing you’ll want to do is to create a shift. A shift simply defines a start time and end time that someone will work. (Obviously!) You can also specify what time is considered “lunch” or “break” during the shift. (You can rename “lunch” to be whatever you want.) Once a shift has been created, you can now assign it to a day. At first, you might decide to add it as an “open shift” so you can get all your shifts set up without anyone assigned to them. (If your schedule changes frequently, you could do this and then duplicate your blank schedule from week to week. However, some places have the same basic people work the same shifts from week to week, so filling in the schedule and then copying it might be less work if all you want to do is make tweaks from week to week.)
Make sure you are looking at the “People” view and the “Open Shifts” option is selected. Mouse over the time you want to schedule the shift for, in the “Open Shifts” row, and click on the ellipsis that shows up in the cell, as in Figure 5. You’ll click on the “+ Add Open Shift” option, which will open up a new dialog window (see Figure 6), where you can specify information about the shift, such as:
- The start and end date of the shift
- The shift color when it shows up on the schedule
- The shift name. (Usually, it just defaults to the start and end time, which is the easiest way to identify the shift when you are looking at summary view of assigned shifts per person. For example, someone would see, “I work the 9 a.m. to 6 p.m. shift.” However, in some cases, employees may be perfectly familiar with knowing what “1st”, “2nd”, or “breakfast” or “lunch”, etc. mean.
- If you have created multiple groupings for your schedule, you can assign the shift to a particular group. (In my example, my team is called Helpdesk, but people on the desktop team might be assigned to Desktop Support or E-mail Support. In Figure 6, a shift is being created for the E-mail Support schedule.)
- You can specify the number of “slots” per shift; i.e. how many people should be assigned to that one shift. (This will help when you’re ensuring that each shift is fully staffed.)
- Any notes you want to add regarding the shift.
- You can also specify when a “break” or “lunch” take place. You can also indicate whether it’s a paid break or not. (Breaks don’t have a start an end time; it just indicates that somewhere in the shift that person should get so many minutes of break. If you schedule a “lunch”, you can actual specify a start and end time for the break.)
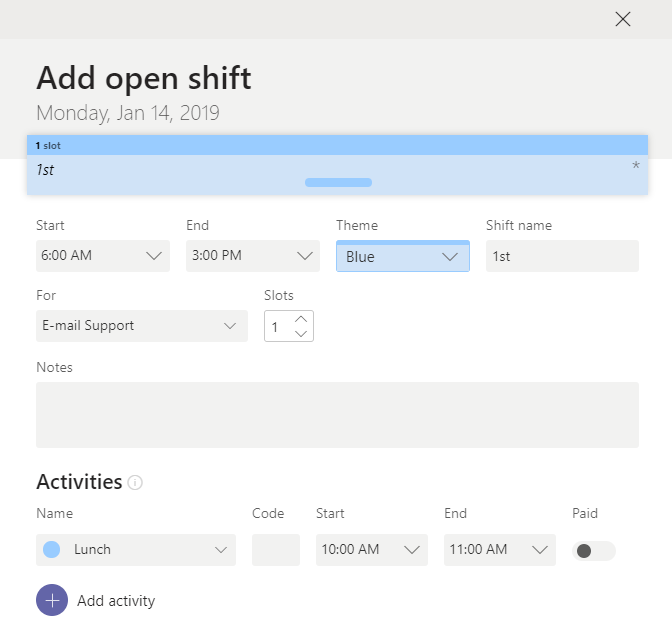
Figure 6: Add Shift Details
After you create the shift, you will see it show up next to “Open shifts”. If you specified a “lunch”, you will even see that visually show up as a darker color on the chart. (See Figure 8.)
Assigning People to Shifts
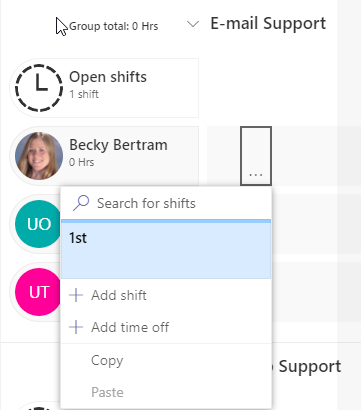
Figure 7: Assign Person to Shift
Now that the shift has been created, you can assign a person to it. (Note that it’s possible to skip the creation of open shifts. Doing so just combines the process of creating a shift and then assigning it.) To assign someone to an open shift, place your mouse somewhere within the day for which you want to assign the shift, next to the person you want to assign to a shift, and click the ellipsis. From here, you can choose the shift to which you want to assign the person. (Note that you’ll most likely have more than 2 shifts. This dialog only shows the most recent 2 shifts, but you can search by shift name and it will find the shift you’re looking for, to select.) Simply click on the shift, and the person will be assigned to it. (See Figure 8.)
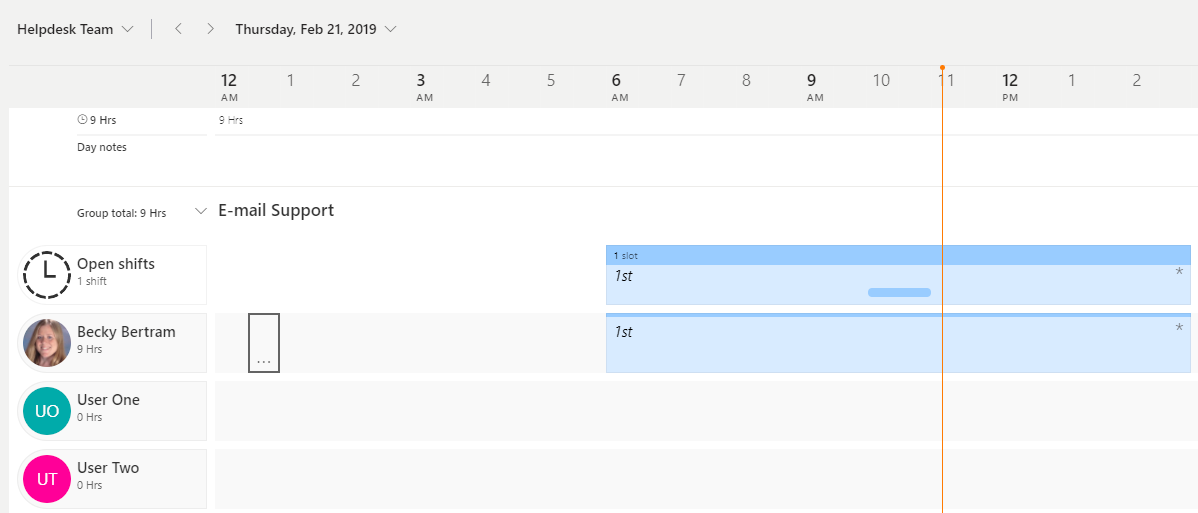
Figure 8: Person Assigned to First Shift
If you want to make changes to a particular person’s shift, you can simply double-click on the shift, and you will be editing that particular shift assigned to that particular person. (See Figure 9.)
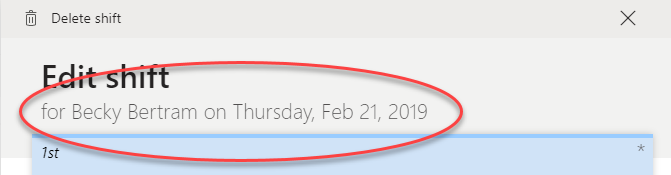
Figure 9: Edit Shift Per Person
When you switch to the Shift view, you can view (per group), the name of the each shift along with a summary view of who has been assigned to the shift. It will tell you how many people have been assigned as well as how many slots are still open for the shift. (Remember, the number of slots were specified when you created the open shift.) If you’re looking at the current day, you will see a little orange line indicating the current time, so you can visually see which shift is active right now and who is assigned to that shift. (See Figure 9.)
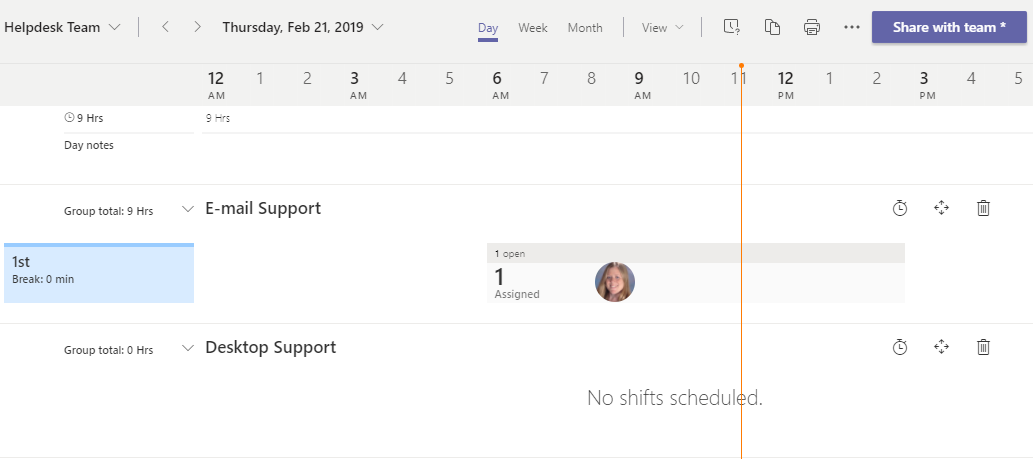
Figure 9: Shift View
Managing Your Schedule(s)
Once you have your schedule in place, you can copy the schedule to a different week. Even better, you can choose what specifically about each shift you want to copy. (See Figure 10.) Additionally, if you want to print your schedule, you can choose if you wan to scale the schedule to one sheet, and you can specify on which sheet size you’re printing out the schedule. (See Figure 11.) The printout gives a nice visual presentation of the schedule per day, week, or month (depending on which view you printed.) In Figure 12, you can see an example of the PDF printout of a particular day (which was created by using the “Microsoft Print to PDF” print driver.) Notice that the legend at the bottom actually spells out the shift start and end times, even if you labelled the shift differently.
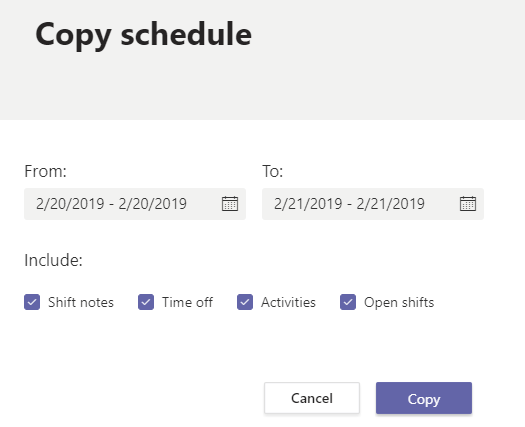
Figure 10: Copy Schedule
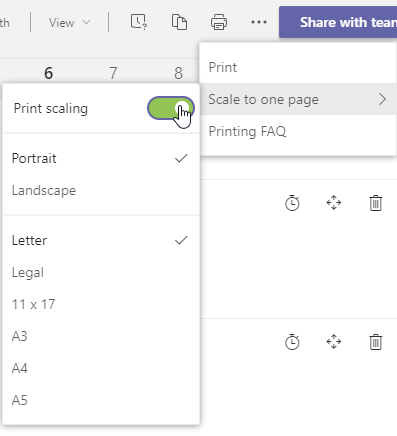
Figure 11: Schedule Print Scaling
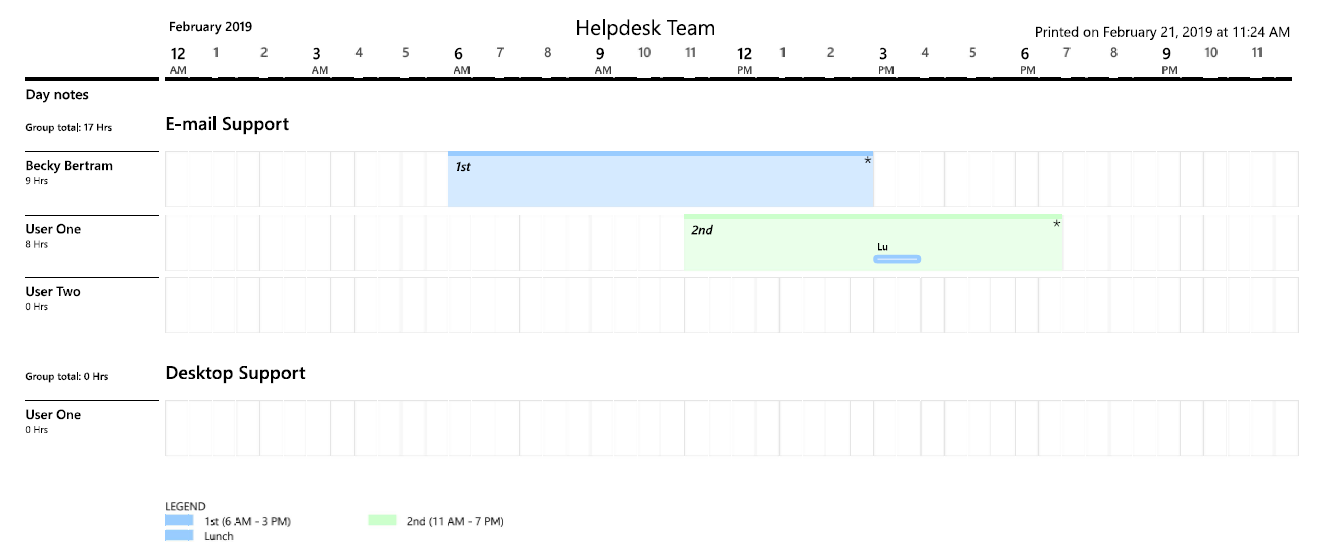
Figure 12: Shift Schedule PDF
To view your currently assigned shifts on a mobile phone, open up the Teams app and click on the small gray divider above your navigation bar at the bottom of the screen. (I have an iPhone so my screenshots are of an iPhone.) This presents several of your available Teams apps, including Shifts. (See Figure 13.) Click on Shifts to view your shift(s). You will see the date(s) and shift(s) to which you have been assigned. If there are open shifts, a worker can view the open shift (Figure 15) and request to be assigned to that shift (Figure 16). If you’re a manager, you can approve or reject the request for the shift (Figure 17).
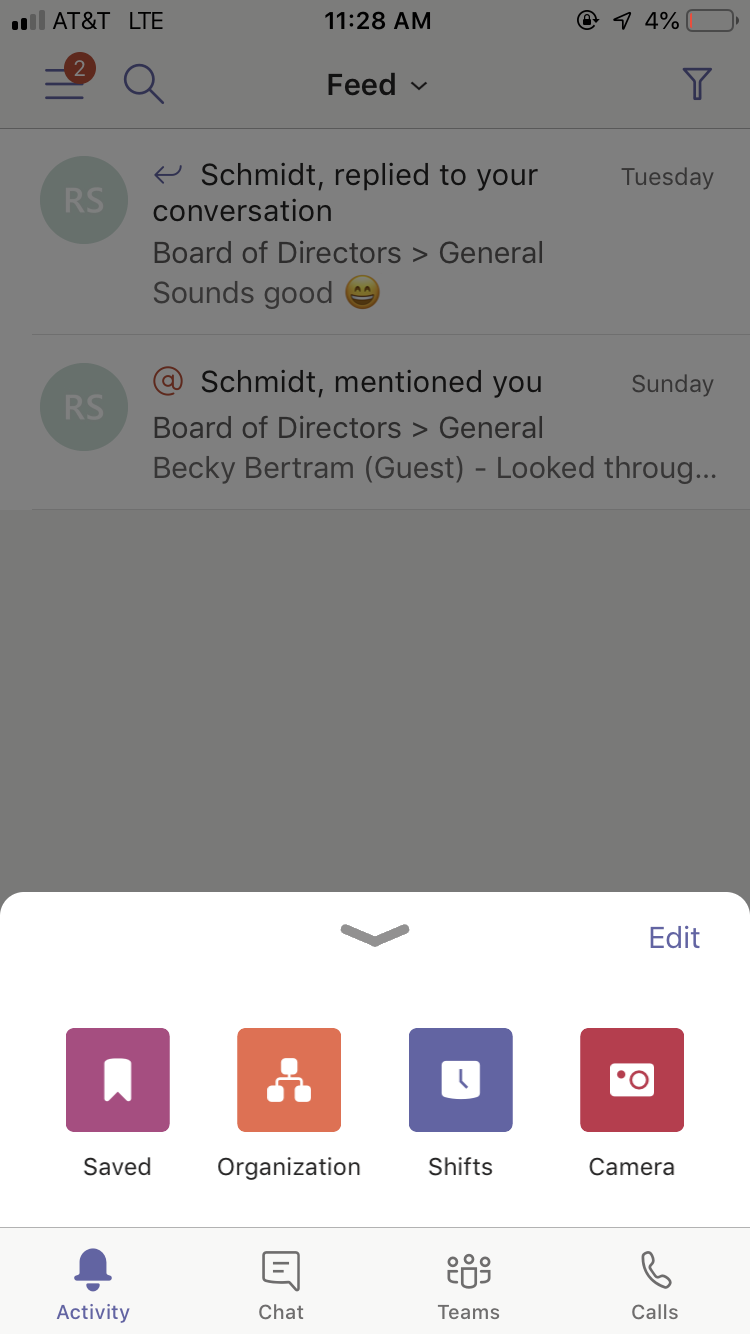
Figure 13: Shifts App in Teams on iPhone
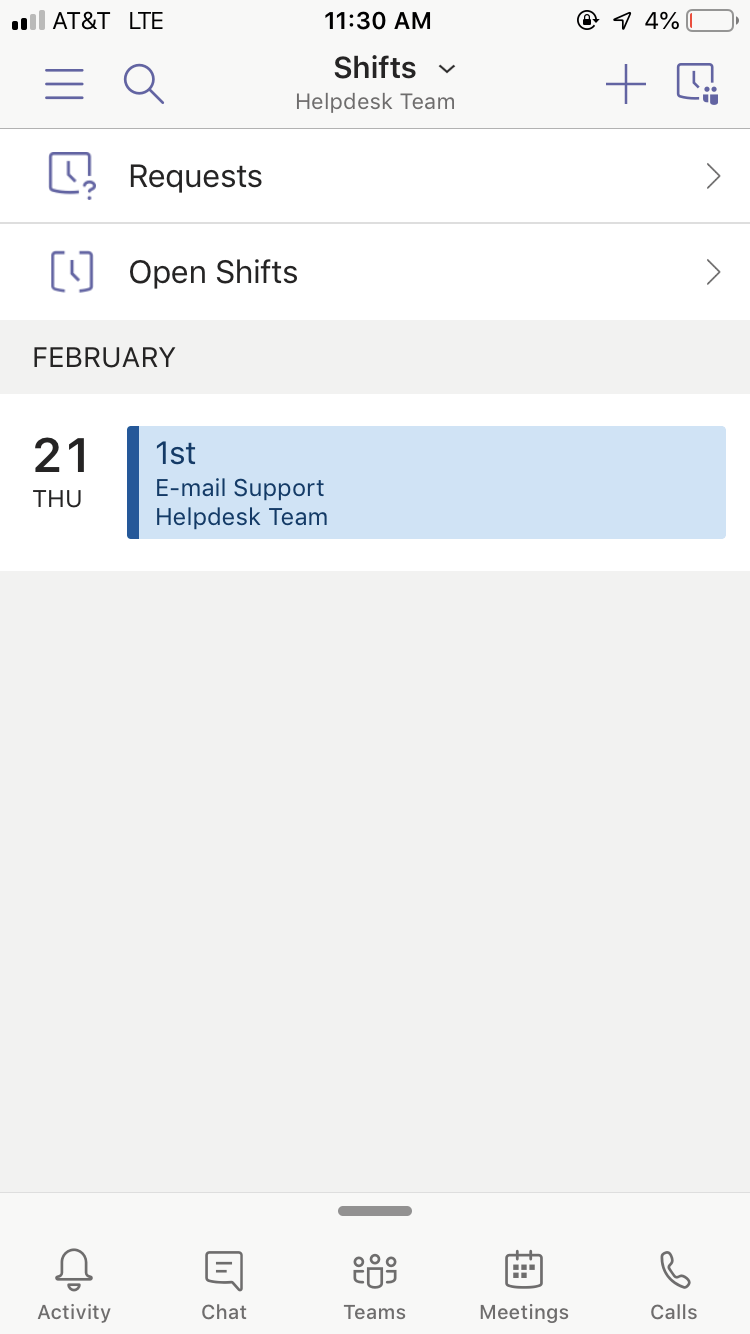
Figure 14: View Shift on iPhone
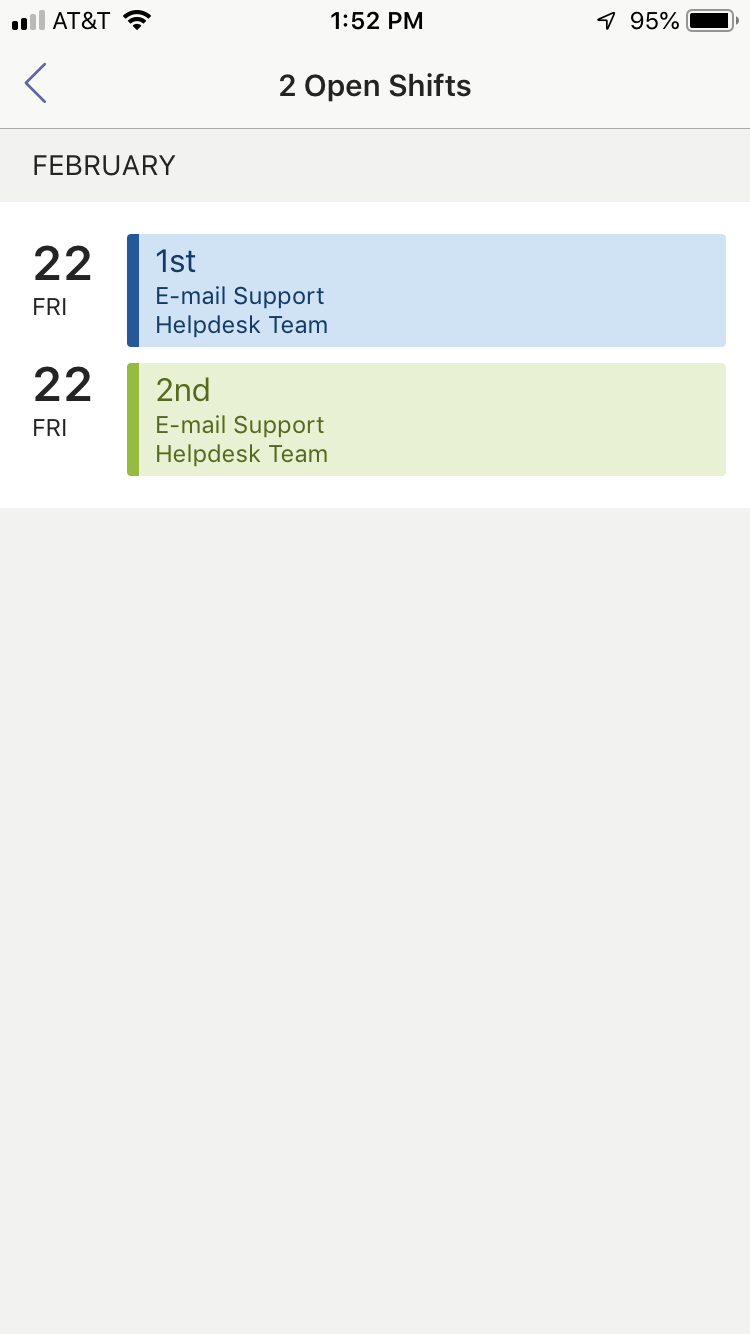
Figure 15: View Open Shifts
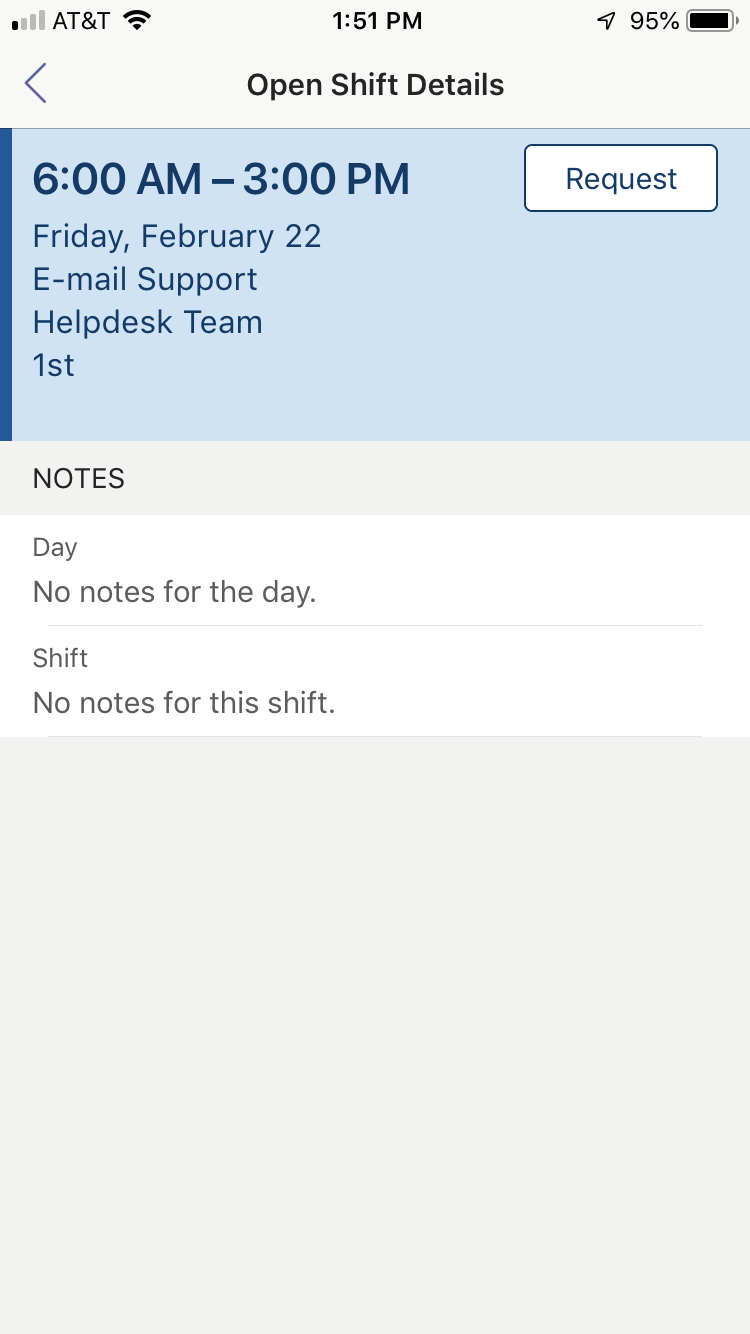
Figure 16: Request Open Shift
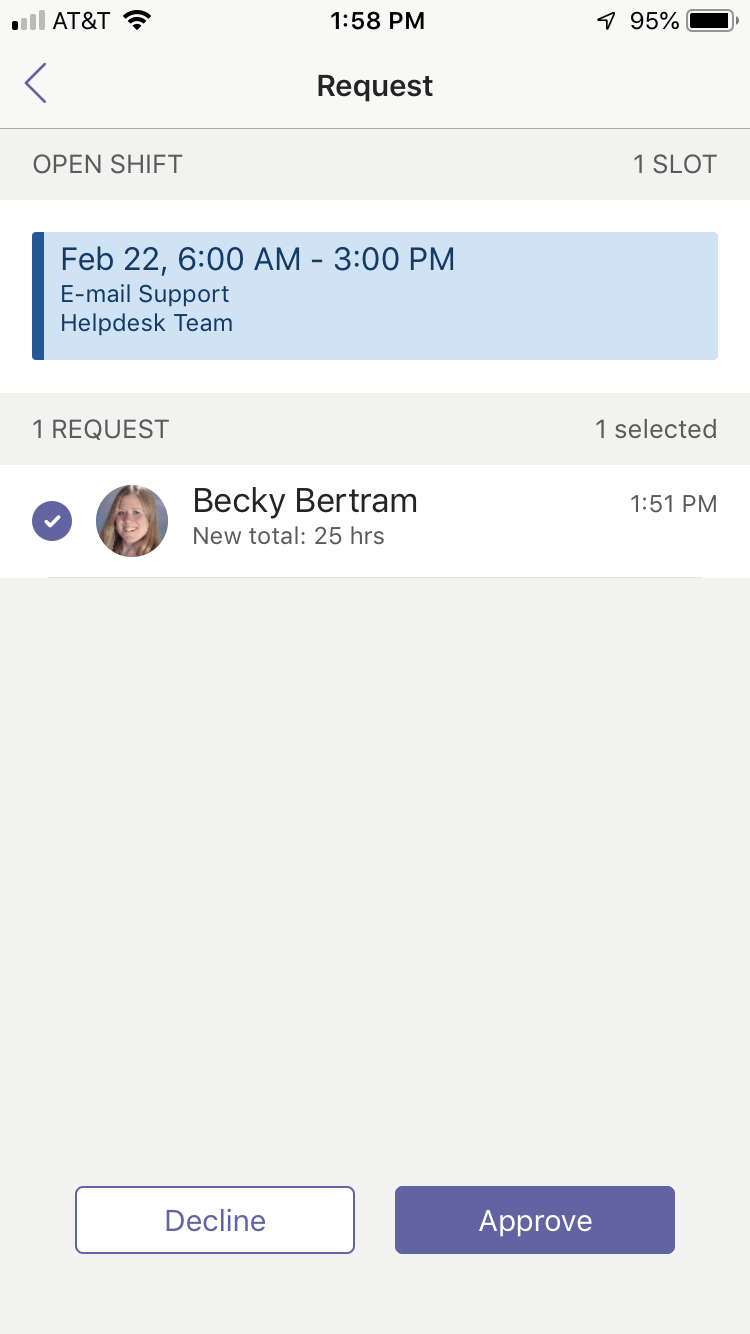
Figure 17: Approve Shift Request
Workers can also request to swap a shift with another worker. To do so, the person specifies the shift they’re working and then chooses which shift they want to swap for. (See Figure 18.)
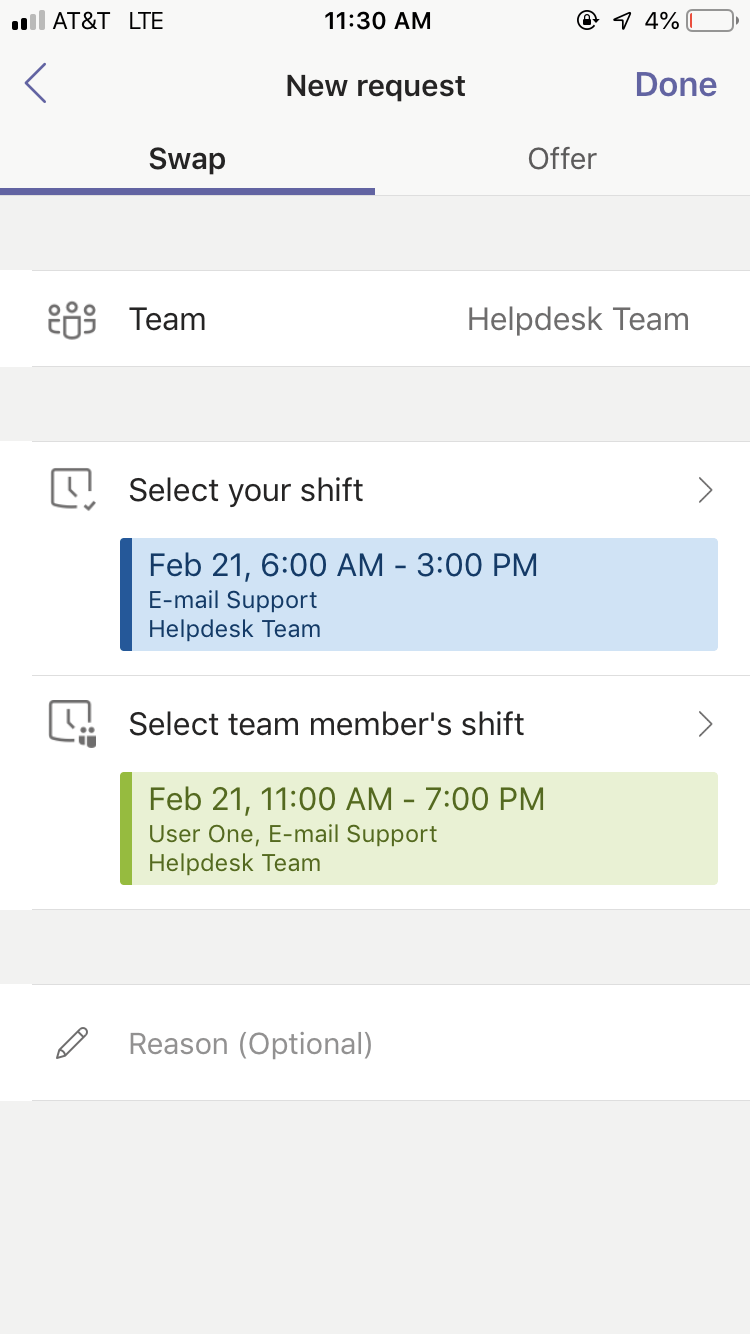
Figure 18: Shift Swap Request
The other user is notified, and can choose to accept or reject the swap. (See Figure 19.)
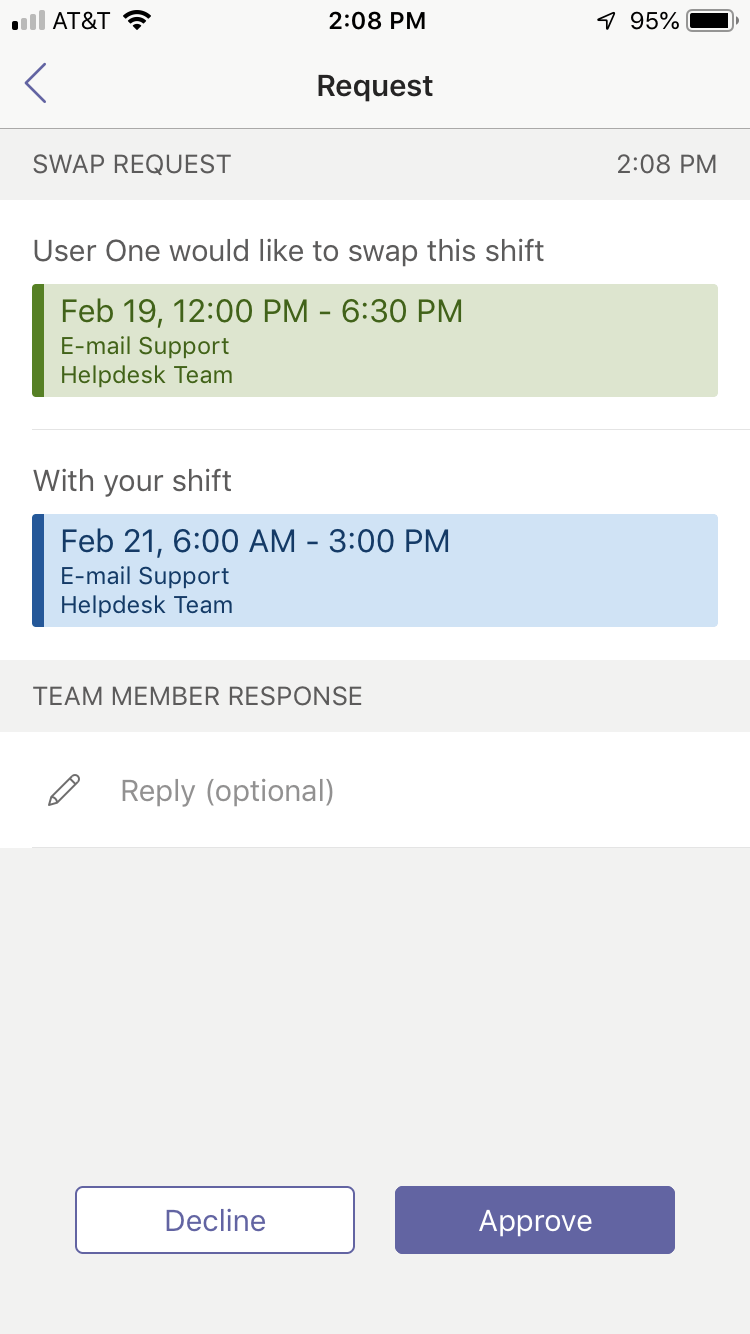
Figure 19: Accept Shift Swap
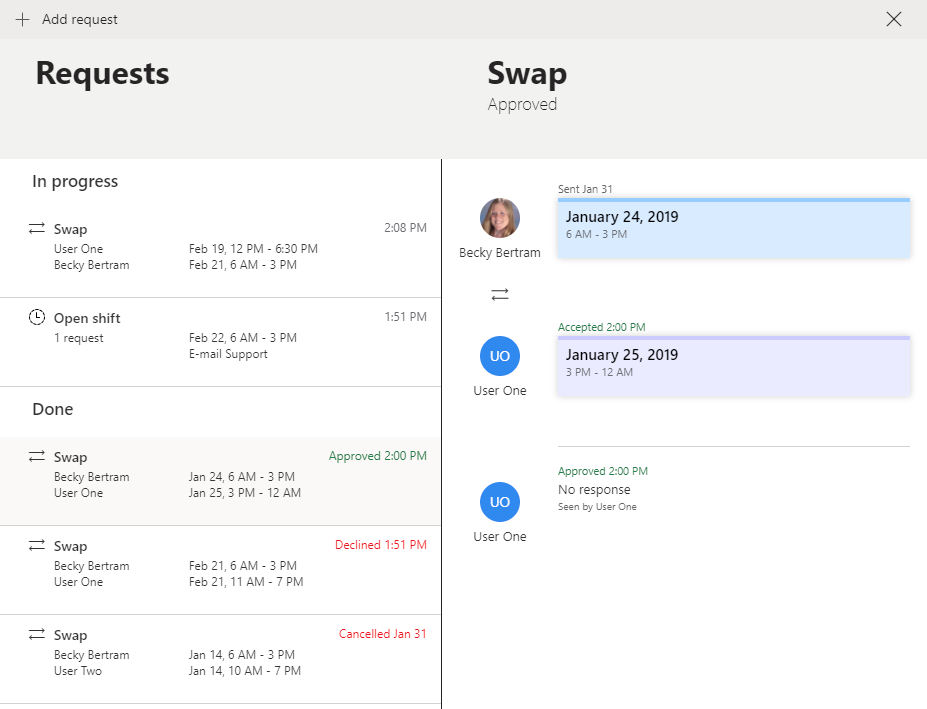
If you are the manager, you can see all the activity going on with shifts, in terms of whom has requested open shifts, who has request shift swaps, and whether the shift swap requests have been accepted or rejected. (See Figure 20.) If someone has actually requested a shift swap with you, you will see that here as well, and be able to approve or request the swap.
Conclusion
The Shifts app is a good way to start scheduling your frontline workers while allowing them the freedom to swap shifts as needed without interference from a scheduling manager. The biggest drawback right now is that there is no way to allow managers to require their approval before a shift swap goes through; at best, managers have to see if anyone has done it and go back and change it if they don’t like it.
Documentation:
Microsoft Teams for firstline workers: Microsoft documentation on the shifts app.
Note that the title of the article doesn’t call out Shifts, although Shifts is the only thing in the documentation so far! To me, this indicates more functionality is to come.
Manage the Shifts app for your organization in Microsoft Teams
Documentation is very light. Focuses on enabling or disabling Shifts for your tenant.
1 Apparently this is a Microsoft invention because every time I type “firstline”, my spell checker underlines it to remind me that this is not actually a word! The grammarian in me wants to hyphenate front-line or just use two words: front line; but no, Microsoft has opted for creating a brand new compound word. Thanks, Microsoft! Sigh.
2In the past, Microsoft labelled the licenses themselves “kiosk” licenses (because users didn’t require a full version of the Office desktop clients; they were just for workers who used Office Online in a sort of “kiosk” scenario.) Luckily they have lost the kiosk terminology in the sense that in a kiosk setting, even the kiosk is fairly stationary, usually. Firstline workers themselves are on the go. From a licensing perspective, these are still users who probably don’t require an Office desktop license. The license is now called an “F1” license for “Frontline”.
3Kaizala sort of throws a wrench in what would otherwise be a very thought-out strategy. My guess is that Kaizala will eventually be rolled into Teams.